So the first week of Big Game Project, project that will eventually be on the GGC floor has started
The concept itself was not done during this week but has been iterated upon for several weeks beforehand so we knew exactly what to do once the course started, thus giving us more time in the production phase.
The concept is a fast paced adventure game where your avatar is a robot that is broken, for the player to move you have to use boost nodes placed on the level to move forward and explore. Read more about the concept here https://drive.google.com/file/d/0B29qyva6DiC8Z21LdmlQMHlHcG8/edit?usp=sharing
I’m the designated Lead Artist, so I’m the person every model, animation, texture and level will go through as a final step in the pipeline to make sure everything is coherent and matched the initial concept we started with.
This week I have been working on some general assets that will go into all the levels in the game, different kinds of stones and light sources.
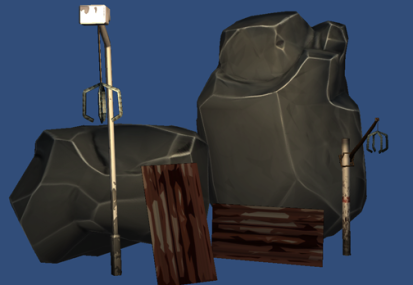
The Stones
I took a lot of inspiration from the rocks in Dota 2, very simple with strong highlights on the edges.
I made a high-poly model in Z-brush and then exported them to 3DS max, but before I did that I had to cut the poly count on them or max would crash so I used a plugin called Decimation Master, they started out at about 4 million tris and I was able to cut them down to about 250k each without losing detail. I also made the rocks so that they can be rotated in every direction to create variation in the rock pattern since I have only planned to make more if the time allows it, so by doing this I give the level designers some options to how they want to place the rocks and give them more option on how to use them.
But 250k is still way too much for a game so I had to further optimize the models. By using ProOptimizer modifier I could go down from 250k to about 120 tris and still have the general silhouette of the objects. I then Unwrap the UV’s for both stones and bake a normal map from the high-poly models.
I was going to bake an ambient occlusion map as well but for some reason my max refused so I had to come up with another way to do it. So I used a program called CrazyBump to do it, I also got made a specular map in CrazyBump form the normal map.
I then took everything into Photoshop to adjusted colors and to add the specular to the diffuse, by doing it this way we can save some space and not have to code a custom shader for Unity but it makes it harder to change the specular later on if wanted.
Light sources
The process is pretty much the same but I did not use Z-brush for these. The two have very distinct designs and are supposed to be used on different places. The first one is a light post that the robots have attached their own technology on with materials they could find around, in this case a rope. This will be used in the city area where there are natural light posts accruing placed by the humans.
The other design however is just scrap the robots have found and made their own posts. This will be used for the areas outside the city.
Corrugated Plates
Once again the process of the plates is much similar to the stones except for the Z-brush part. This will be used for many different things as decoration and as part of the level design where you can go upon them.
Next week I will be doing more assets for the game, next on the agenda pipes that you can go inside.
/Mikael Karlsson
